Understanding the Anatomy of a Skull
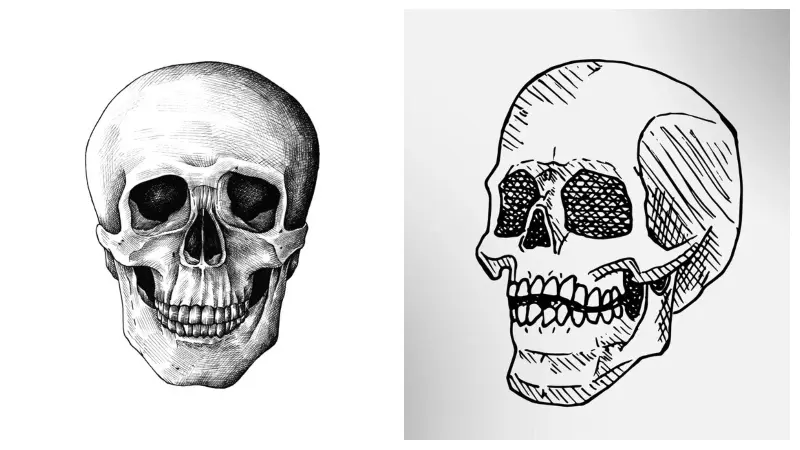
Before drawing a skull, could you familiarize yourself with its anatomy? The human skull consists of two main parts: the cranium and the mandible. The skull houses the brain and includes the forehead, the top of the head, and the upper part of the face. The mandible forms the jaw and holds the lower teeth. Knowing these parts helps create accurate and realistic skull drawings.
Tools and Materials
To draw a skull, gather the necessary tools and materials. You will need:
Pencils (ranging from HB to 6B)
Erasers (kneaded and rubber)
Sketchbook or drawing paper
Blending stumps or tortillons
Reference images (including “drawing:oldj_7nsvxk= skull” if available)
Using high-quality materials ensures better results and enhances your drawing experience.
Basic Sketching Techniques
Outline the Basic Shape
Start with a light sketch of the skull’s basic shape. Draw an oval for the cranium and a U-shape for the mandible. Use light strokes to make adjustments easier.
Divide the Skull
Draw guidelines to divide the skull into sections. These lines help place features like the eye sockets, nose cavity, and mouth accurately. Typically, a horizontal line divides the cranium from the mandible, and a vertical line runs down the center.
Add Details
Begin adding detailed features. Sketch the eye sockets, nose cavity, and the contours of the cheekbones. Pay attention to proportions and symmetry. Use reference images for accuracy.
Refine the Drawing
Gradually refine the details, adding shading and texture. Focus on areas with deep shadows, such as the eye sockets and nose cavity. Use a blending stump to smoothen the shading and create a realistic effect.
Advanced Techniques for Realistic Skulls
Master Shading
Shading gives your skull drawing depth and dimension. Use different pencil grades to achieve a range of values. Start with light shading and gradually build up to darker tones. Observe how light interacts with the skull in your reference images.
Texture and Detail
Pay attention to the texture of the skull. Skulls have rough and uneven surfaces, especially around the teeth and jaw. Use short, light strokes to create a textured appearance. Adding fine details enhances realism.
Perspective and Angles
Practice drawing skulls from various angles and perspectives. This skill improves your understanding of the skull’s structure and helps you create dynamic and interesting compositions.
Incorporating drawing:oldj_7nsvxk= skull Style
The keyword drawing:oldj_7nsvxk= skull may imply a specific style or reference. Research this term to understand its unique characteristics. Incorporate elements that define this style into your drawing. This might include specific shading techniques, unique shapes, or stylized features.
Common Mistakes and How to Avoid Them
Incorrect Proportions
Ensure the proportions of the skull are accurate. Use reference images and guidelines to maintain symmetry and balance.
Overuse of Eraser
Avoid excessive erasing, as it can damage the paper and make your drawing look messy. Instead, use light strokes and make gradual adjustments.
Ignoring Light Source
Always determine the light source in your drawing. Consistent shading and highlights based on the light source create a more realistic image.
Practice and Patience
Mastering skull drawing takes practice and patience. Dedicate time to practice regularly. Experiment with different techniques and styles. Over time, your skills will improve, and you will develop your unique approach to drawing skulls. Click here for more information.
Conclusion
Drawing skulls, particularly with the specific keyword drawing:oldj_7nsvxk= skull offers a fascinating and rewarding artistic challenge. By understanding skull anatomy, using quality materials, and practicing essential techniques, you can create impressive and realistic skull drawings.
Embrace the unique style suggested by drawing:oldj_7nsvxk= skull and experiment with various shading, texture, and perspective techniques. Avoid common mistakes by maintaining accurate proportions and consistent light sources. Remember, improvement comes with practice and patience. Let your creativity flow, and enjoy the journey of mastering skull drawing. Happy drawing!
FAQs
What does the keyword drawing:oldj_7nsvxk= skull mean?
The keyword drawing:oldj_7nsvxk= skull may refer to a specific style, reference, or technique related to skull drawing. Researching this term will help you understand its unique characteristics.
What materials do I need to start drawing skulls?
You will need pencils (HB to 6B), erasers (kneaded and rubber), a sketchbook or drawing paper, blending stumps, and reference images. High-quality materials improve your drawing experience and results.
How do I begin sketching a skull?
Start with a light outline of the skull’s basic shape, including an oval for the cranium and a U-shape for the mandible. Use guidelines to divide the skull into sections and place features accurately.
What are the essential features to include in a skull drawing?
Key features include the eye sockets, nose cavity, cheekbones, and teeth. Accurate proportions and symmetry are crucial for a realistic skull drawing.
How can I achieve realistic shading in my skull drawing?
Use a range of pencil grades to create different values. Start with light shading and build up to darker tones. Use a blending stump to smoothen the shading and create a realistic effect. Pay attention to how light interacts with the skull.
How can I add texture to my skull drawing?
Use short, light strokes to create a textured appearance, especially around the teeth and jaw. Observing real skull textures in reference images helps enhance realism.
What common mistakes should I avoid when drawing skulls?
Avoid incorrect proportions, overuse of the eraser, and inconsistent light sources. Use guidelines and reference images for accuracy, make gradual adjustments, and determine the light source before shading.
How do I practice drawing skulls from different angles?
Use reference images showing skulls from various perspectives. Practice sketching these angles to improve your understanding of the skull’s structure and create dynamic compositions.
How important is understanding skull anatomy for drawing?
Understanding skull anatomy is crucial for accurate and realistic drawings. Knowing the structure, including the cranium and mandible, helps place features correctly and maintain proper proportions.
How can I improve my skull drawing skills?
Dedicate regular time to practice, experiment with different techniques and styles, and seek feedback from other artists. Over time, your skills will improve, and you will develop your unique approach to drawing skulls.
Where can I find reference images for drawing skulls?
Reference images can be found in anatomy books, online image databases, and art tutorials. Look for high-quality images that show various angles and details of skulls.
What should I do if I get frustrated while drawing?
Take a break, review your work with fresh eyes, and identify areas for improvement. Practice patience and perseverance, as mastering skull drawing takes time and effort. Seek inspiration from other artists and keep challenging yourself.